Making The MetaBox Shader
A few weeks ago I entered Look What I Made Weekend (check it out if you’re into things like Ludum Dare) with the goal of writing a shader for one of my little pet projects. In this particular project, Metabox, the world is a tree structure of “recursive” 7x7 grids. That is, each level is a small box, containing other levels and various other elements. Each wall of a box can have a “meta-door” which, when open, creates a continuous connection between parent box and it’s child box.
I wanted to create an effect that would cause the internal space of a sub-box around the door to visually stretch to the scale of its parent to give an illusion of spatial continuity. Something like this (a little pic of the final result):
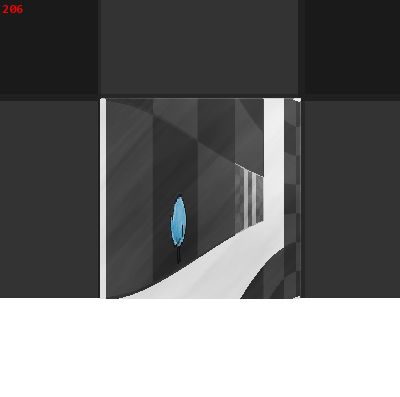
In this picture, the player (the little blue guy) is just inside a sub-box and a door is open on the left face.
The requirements for my door/shader are:
- The door can be on any face.
- The door can align with any of the 7 internal slots.
- Space immediately inside an open door is scaled to match space immediately outside it.
- Space on the internal face opposite the door remains at the internal scale (1/7th that of the parent).
- There is a shader parameter for intermediate stages (ie, as the door is opening or closing, for smooth transitions).
So now that I’ve accosted you with an ample introduction, onward to the real actual content. Here was my approach, in a nutshell.
I checked all my math with Mathematica, and wrote some little graph-rendering things to model the shader so I could tweak it before actually implementing it. I put the playable notebook file up here. If you’re interested in playing around with it, you’ll need the CDF player.
My little sketches of what I wanted it to look like reminded me of graphs of the smoothstep equation, so I thought I’d start there, along with the assumption that the door will always be on the right face of the box. The basic idea of smoothstep is that you set boundaries on a basic third degree (or higher) polynomial and its first derivative. In our case, the first boundary depends on the position inside the texture (a point in the exact center of a side-door will not move, but a point above or below it will). The derivative boundary on the other hand, is always zero.
To help determine the boundary of the polynomial, I wrote a simple time-dependent function which maps the y-value of the original pixel to its final value. It’s really no more than a linear function whose slope depends on t. Here - have a graph.
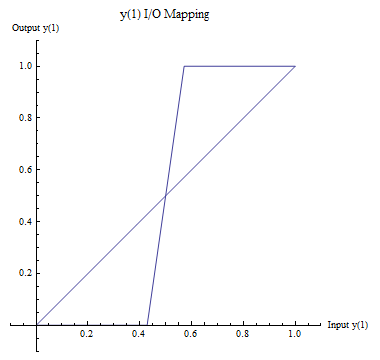
The horizontal axis of this graph is the original y-value of a pixel on the door-face, and the vertical axis is after the transformation. The 45 degree line is the boundary function at t=0 and the other is t=1. Since I was already getting all into smoothstep stuff, I decided to use the simple 1D smoothstep on t to “ease” the transition. This way the host code can just linearly transition t from 0 to 1 and we’ll still get a nice smooth door transition, but really I could have left that burden of tweening to the host.
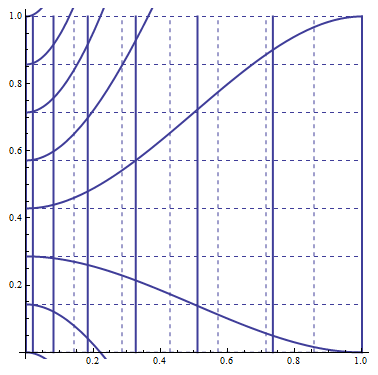
Applying the boundaries to our polynomial, we now have a function of the form y=y(x0, y0, t), where x0, y0 are the original pixel positions. What about x, you ask? Well a convenience of my approach is that they’re de-coupled, so we can do anything we want with x that puts it in the form x=x(x0, y0, t). A major limitation, however, is that x and y become coupled when we invert the equations, so we have to choose them in a way that will not make the inversion too much of a pain in the ass (or even impossible). x is really boring and since our transformation is primarily with y, I’ll ignore x for now (it’s in the mathematica notebook).
We now have an equation giving us (x,y), the 2d coordinates of a point after having been transformed by the pixel shader, from (x0, y0), the original coordinates of the point.
However, what we need is precisely the opposite. A pixel shader function is given a reference to a texture and the texture coordinates of the current fragment being rendered, and it sets the color of the fragment. A trivial shader would just set the fragment color to the color of the pixel on the input texture which corresponds to the fragment’s coordinates.
So in order to find the coordinates on the texture from which to pick the color we’re looking for, we must invert our equations, solving for x0 and y0 in terms of x, y, and t. A deceptively simple-sounding final step, to be sure. This is where Mathematica was most useful (although I do not recommend using it as a total replacement for pen/paper calculations, I didn’t want to completely recalculate the inversion by hand every time I wanted to tweak a previous equation).
Well I suppose that’s it - a rather cryptic description of my thought process in developing my first shader. Here’s a video of the shader in action:
Note: I originally posted this article here, at GameDev.net